Serverless Background Jobs with AWS
Simple, scalable, serverless.
Mar 14, 2021
Background Jobs
In a web application there will typically be the need to perform work outside of the synchronous request-response lifecycle. Imagine for example the simple case of someone signing up to your service. In this scenario you might want to send a 'welcome' email to the new customer after they've performed the initial step of entering their name and email address. Rather than generating the email content and sending it to your email service as part of the request-response lifecycle, you decide to queue a job to perform this task in the background. That way your customer's experience is fast and responsive, and they can quickly move on to the next stage of the signup process, for example configuring your service to their needs.
Another example might be that after a particular record is updated in your database, some logic should run to determine if other records need to be updated as a result. Again, to ensure a responsive system, it is beneficial to have this logic run in the background, outside of the request-response lifecycle. Essentially, if a separate piece of work does not need to be completed before responding to the original request, then it should ideally be moved into a background job.
Mechanisms
There are various mechanisms, tools and frameworks that can be used to achieve background processing. Each have benefits and drawbacks for various use cases, and many are tied to the technologies you use in your application. For example, the second example mentioned above regarding running some logic after a database update might be best achieved using DynamoDB streams – if you use DynamoDB as your database. Depending on your use cases, you may choose to use a variety of different mechanisms to achieve background processing for your application's needs.
In this post, we'll build a serverless, message-based, on-demand job processing microservice using AWS (Amazon Web Services) technologies: SNS (Simple Notification Service), SQS (Simple Queue Service), Lambda and CloudWatch. We'll create and integrate these resources using CDK (Cloud Development Kit).
Solution Architecture
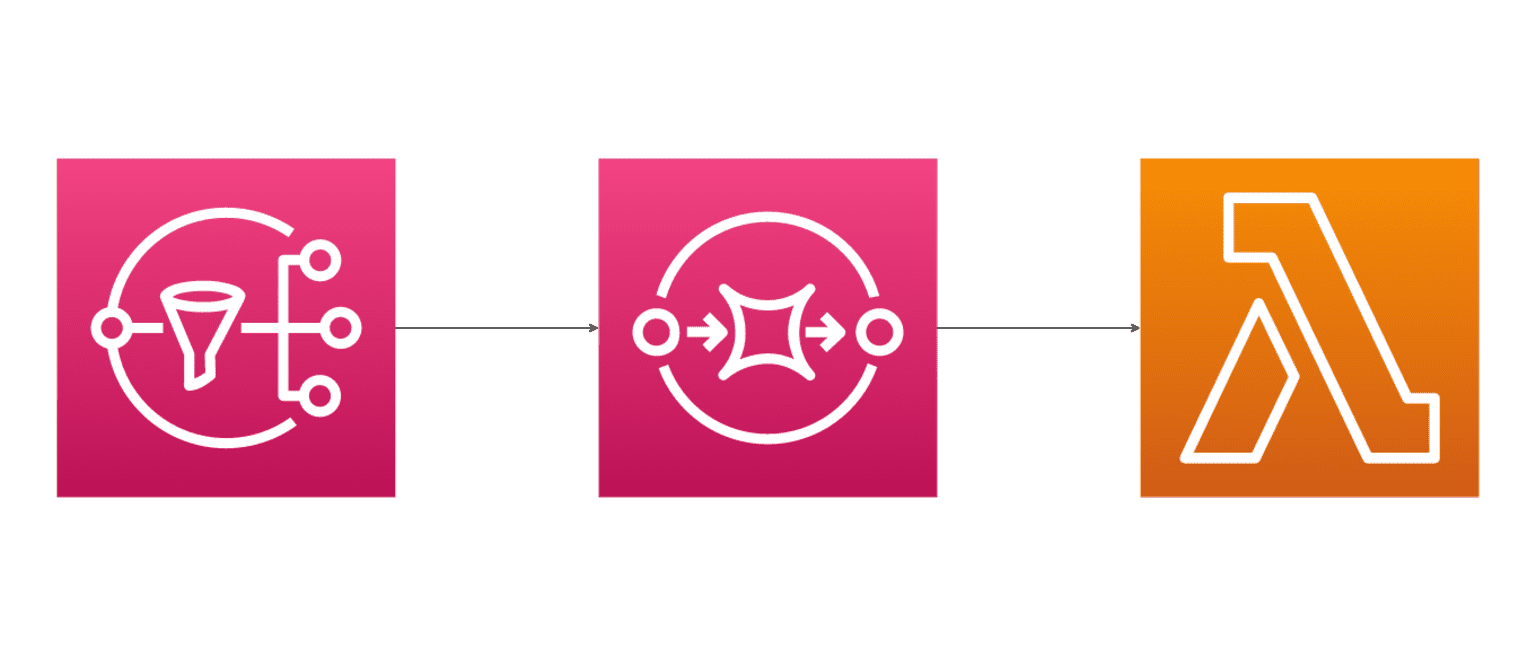
The entry point of our background job service will be an SNS topic. Messages can be published to this topic from any other system or application for which we allow access. A message will be in JSON format. After a message is published to the topic, it is routed to an SQS queue based on the provided jobName message attribute – each type of job in our system has its own queue.
From there, the job will be picked up by a Lambda function for processing, where the function may of course interact with external resources such as databases based on the use case. If the processing succeeds, the job is removed from the queue and the work is done. If the processing fails, the job is placed back on the queue, and will be picked up again after a configured amount of time. If the processing fails consecutively up to a configured maximum number of attempts, the job will be moved to a separate SQS queue called a 'dead letter' queue (DLQ) – each type of job also has its own DLQ.
After one or more jobs have been in the DLQ for a configured amount of time, a CloudWatch alarm will trigger. We can use this alarm to alert us to the failure/s so that we can inspect our system to determine what is going wrong. We might for example configure the alarm to send an email to our ticketing system by setting up and integrating with a separate SNS topic.
Here's a basic diagram that describes the components of the system and their interactions: 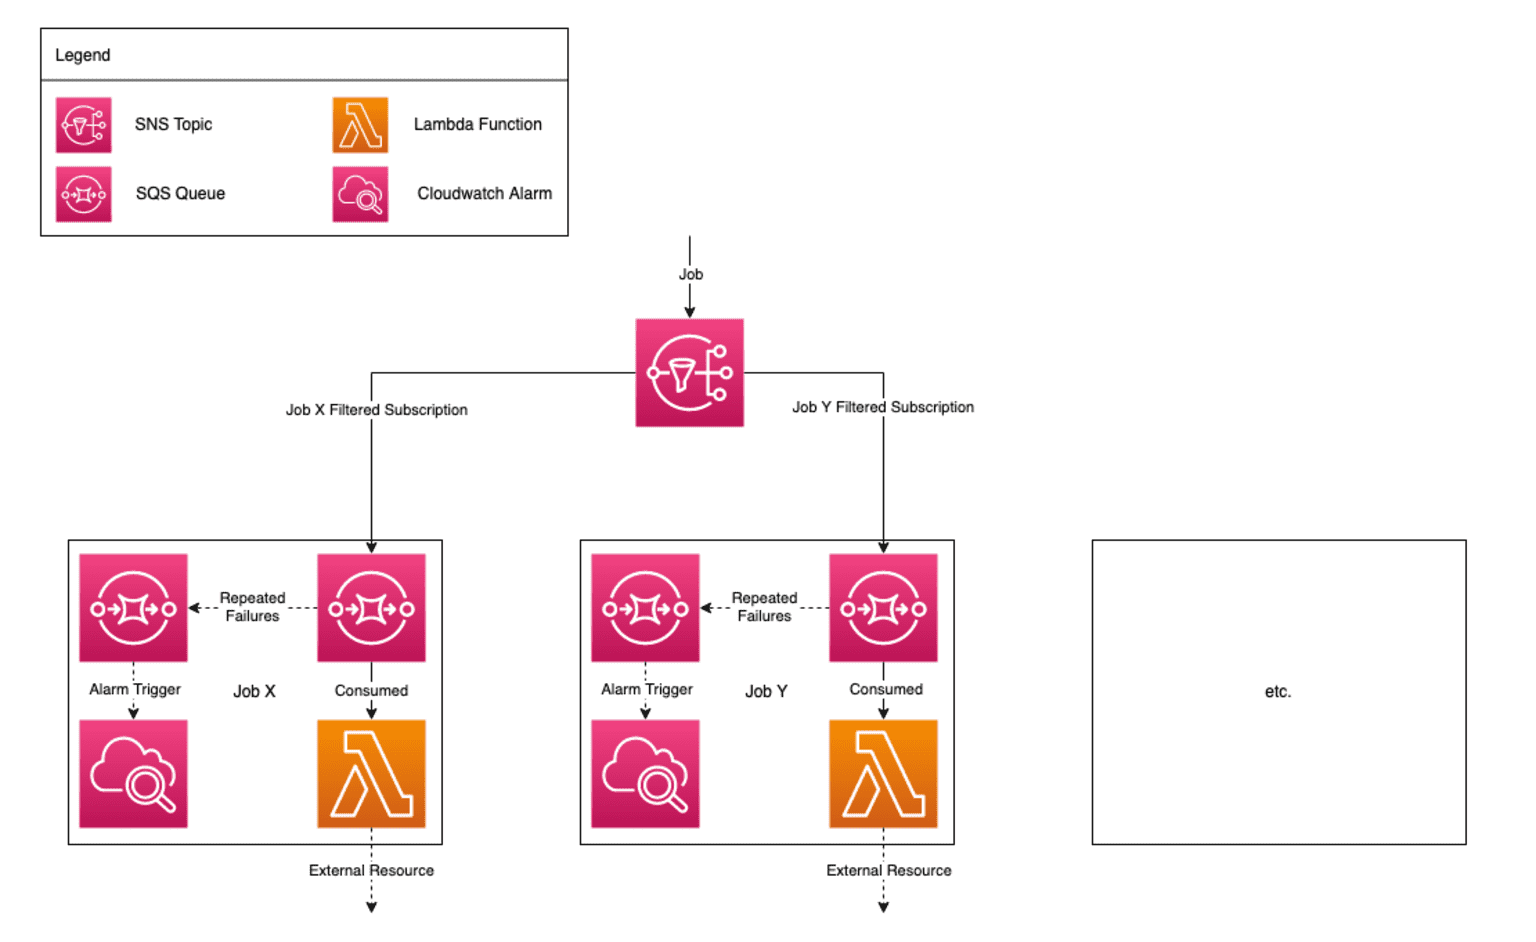
Separate Resources Per Job Type
One of the design decisions made here is that each job type has its own queue, DLQ, function and alarm. The only shared component is the SNS topic entry point. The primary reason to build the system in this way is to utilise the built-in SQS, Lambda and CloudWatch options to configure a separate timeout, retry delay, maximum number of attempts, time-to-alarm etc. for each job. The alternative would require custom logic to properly handle failures and retries per job type, would become difficult to manage and wouldn't scale well.
Completely separating the job processing code into separate Lambdas also allows us to keep the size of our Lambda packages small, containing only the code that they need to process a particular job. Note that sharing common code is still something that can be done with no problem whatsoever, and we could even employ Lambda layers to share code if we wanted to go down that route.
Implementation
TL;DR – Here's a public git repository containing the example system outlined in this section: serverless-background-jobs-cdk-example
npm i @aws-cdk/aws-cloudwatch \
 @aws-cdk/aws-lambda-event-sources \
 @aws-cdk/aws-lambda-nodejs \
 @aws-cdk/aws-sns \
 @aws-cdk/aws-sns-subscriptions \
@aws-cdk/aws-sqs-D flag) – npm i -D @types/aws-lambda esbuild npm i moment
For this post we'll also add a property to our existing tsconfig.json file to allow us to use a cleaner syntax when default-importing functions from CommonJS modules (e.g. moment): "esModuleInterop": true. An explanation of the problem we're solving here can be found in this stack overflow answer.
Now that we've installed our dependencies, we'll start by creating a src directory to house our job processing logic and configuration. Ultimately, you can structure the content of this directory however you like, but for the purpose of this post we'll create a sub-directory within src called jobs that contains a single file per job. Each job file defines and exports a config object and an asynchronous function to process a batch of jobs. By default Lambda will process batches of up to 10 SQS messages, though for the sake of this example system we have configured a default batch size of (up to) 5 for our jobs.
Back up in the src directory we'll also define some code shared between jobs, and an index file where we will declare and export a list of all job configurations.
In the separate and existing lib directory there should be a file called your-project-name-stack.ts where your-project-name is a representation of the name of the directory you created your TypeScript CDK application in. This is where we will define all of the AWS resources that will make up our CloudFormation stack. In the following sections we'll incrementally add the necessary resources to our stack.
One important thing to note here is that the name of the class in this file must match the name of the file (with an appropriate transformation to camel casing). For example, my file is serverless-background-jobs-stack.ts so the class name must be ServerlessBackgroundJobsStack. This should already be initialised to the correct name when you create your CDK application, but if you're copying and pasting code from this post then be aware that you'll need to modify the class name to suit your application. If you use the wrong class name the CDK CLI will throw an error.
To begin with, we'll create an SNS topic, and create a CloudFormation output for it with a defined exportName so that it can be imported by other service stacks (e.g. a web application server stack) so that they can publish messages to it as necessary.
Next we'll import the list of job configs we defined earlier and loop over them, creating an SQS queue with an associated DLQ for each job, and subscribing each main queue to the SNS topic we created. Each subscription will define a simple filter policy which will cause only messages with the matching jobName to be sent to the queue.
After this, we'll create a Lambda function for each job and associate the function with the main SQS queue by adding an SQS event source to the Lambda function. We'll also create a CloudWatch alarm for each job, attached to the age of oldest message metric on the DLQ.
Of course, with all of the above you should feel free to rename your resource logical identifiers as you see fit, and structure your code however you prefer.
It's important to note that the job name defined for each job's config must exactly match the name of the job file (without the extension). This is because we use this configured name to point CDK to the job file so it can package our Lambda assets. An improvement to the system could be to load job files (and the configurations therein) by scanning the src/jobs directory directly instead of via importing the configurations from src/index.ts. This would help to avoid the 'brittleness' that comes with the name matching approach, though we would need to ensure that we could appropriately handle the case where someone adds some non-job file to the src/jobs directory – we wouldn't want to create resources for such a file.
Deploying
Before deploying, we'll need to 'bootstrap' our AWS account for CDK because our stack contains resources with assets – in our case the assets are the code packages for our Lambda functions. Bootstrapping essentially just creates an S3 bucket that is used by CDK to manage these assets. You only need to bootstrap your AWS account once. If you've already bootstrapped your account for a previous CDK application then there is no need to do it again. Note that if you try to bootstrap an account that has already been bootstrapped you'll just receive a message telling you that the environment is already bootstrapped and nothing will happen – so there's no harm in running the command if you're not sure.
cdk bootstrap
Now that we've bootstrapped our AWS account, we can go ahead with the deployment. The first thing we need to do is synthesize our CDK stack. This step generates a CloudFormation template, bundles our Lambda function code into discrete assets (it also converts the code from TypeScript to JavaScript), and produces various other files required for the deployment of our stack. These are output into the cdk.out directory. You'll also note that it prints the entire CloudFormation template to the console – this template is all of the configuration that we've just saved ourselves from having to write by using CDK (not to mention other savings made such as not having to manage the bundling of our Lambda code)!
cdk synth
Once our stack has been synthesized, we can go ahead and deploy it. This will produce a summary of IAM statement and policy changes and then ask for user input to confirm if you want to go ahead with the deployment. Note that you can remove this manual approval step by adding the --require-approval never option to the command below as described in the CLI reference.
cdk deploy
At this stage, our background job system is operational! Go ahead and test it out by publishing messages via the SNS console in your AWS account. Remember that the message content should be JSON such as { "friendName": "Hank" } and you should include a 'String' message attribute jobName with the value set to the appropriate job name, for example GreetingJob. After publishing a message, you should see the 'Messages available' count increment for the associated queue in the SQS console (you may need to refresh vigorously to catch it before the associated Lambda function picks it up – and even then you might miss it!), and you should see processing logs in the CloudWatch log group for the associated Lambda function.
You can also try posting a message like { "shouldFail": true } to test out the failure scenario. In this case failure logs should appear in the CloudWatch log group and once the job has failed enough times (with a retry delay in-between each failure) it will be moved to the associated DLQ and you should see that the 'Messages available' count has incremented for that DLQ.
Also, if you're interested in seeing how CDK packages the Lambda function code (via the esbuild dependency we installed), take a look at your functions in the Lambda console. You'll see that the TypeScript code has been converted to JavaScript and all modules (including dependencies) have been in-lined into a single file, with comments added to denote the boundaries between each module. Importantly, only the code required for the job will be present, thus minimising the package size for each function.
Additional Considerations
Local testing – To test your Lambda functions locally you can utilise the SAM (Serverless Application Model) CLI as described in this documentation from AWS. Automated testing can of course be done as normal using a tool like Jest, which is included out of the box when creating a TypeScript CDK application.
Alarms – Rather than alarming on the age of the oldest message in a DLQ you may want to alarm when the number of messages in a DLQ crosses some threshold. There are benefits and drawbacks for either option, and you may even want to create a composite alarm so that you are notified only when both conditions are met.
DLQ retries – This background job system automatically retries failures as they occur based on our configuration, but depending on your use case you may want to also configure a separate process to allow you to retry the jobs that were moved to the DLQ. An example scenario might be that a service that one of your jobs depends on goes down for an extended period of time, so a large number of messages are moved to the DLQ. After the service comes back up, it would be useful to have a mechanism to move all of those messages back to the main queue. One way of doing this could be to set up a Lambda function for each DLQ that moves messages from the DLQ back to the main queue, and you could manually trigger this function as required.
Idempotency – Because this system is built to automatically retry failures, you need to ensure that your jobs are written with idempotency in mind. You should be able to process the same job (i.e. with the same parameters) multiple times with no negative effects. This is especially relevant for jobs that perform multiple actions – if a job completes action 'A' and then action 'B' fails, when the job is retried you want to make sure that performing action 'A' again will not cause problems, or write the job so that it checks to see if action 'A' has already been completed before performing it for example.
Concurrency – The system outlined in this post makes use of Lambda's unreserved concurrency, which means that it shares a per-region concurrency limit with other functions in your account. By default this limit is 1,000 but you can request a quota increase if necessary. A key concern with this approach is that even though your Lambda functions will be able to scale well, external resources or services that they interact with may not be able to scale to the same degree, so it's possible that you might brown out that external service if a large burst of messages is received. To mitigate this you can set a reserved concurrency limit for each of your functions as necessary, though doing this can cause a separate issue where you may see an increased rate of message failures if there is a large burst of messages, since now that your Lambda function has been limited it may not be able to handle the burst and will return a throttling error to SQS. To deal with this issue you'll need to adjust your max attempt count and retry delay. AWS generally recommends setting a retry delay (visibility timeout) equal to at least 6 times your function's timeout value, and a max attempt count (max receive count) of at least 5. More information can be found here.
Scheduled or recurring jobs – The system we've built in this post is designed for on-demand background job processing, and does not handle scheduled or recurring jobs out of the box. In terms of scheduled jobs – i.e. jobs that are scheduled to run at some point in the future – you can set an initial invisibility period on a message when it is posted to an SQS queue to delay its processing, but the maximum delay is only 15 minutes and you'd also need to bypass the SNS topic and send messages directly to the SQS queue which would muddy the interactions between your systems. So for scheduled jobs you'd want to look for a different solution to meet your needs or build a bespoke scheduled jobs system. As for recurring jobs, the system outlined in this post can be easily extended to separately define Lambda functions for your scheduled jobs and configure CloudWatch events to trigger them on a schedule rather than using an SQS queue as the event source. One important note to mention is that this is best suited for recurring jobs that are not too long-running – Lambda currently has a 15 minute maximum timeout, so keep that in mind. More information on this approach for recurring jobs can be found here.
Fargate – If your average concurrency is expected to be particularly high, and especially if you are expecting that your job processing will essentially be constantly running, you may want to consider utilising ECS Fargate for your processing rather than Lambda. In a solution like this you would define a Fargate task per job type that polls for messages on its associated queue, and you would configure the service so that the number of running tasks automatically scales to the number of messages on the queue. Lambda is better suited for burst processing rather than 'always on' tasks.
Conclusion
In this post we've designed and built a simple, serverless, scalable background job system using AWS technologies. This system is well equipped to deal with basic on-demand jobs that your web application or other services may have, and can be easily extended to also handle non-long-running recurring jobs.
Hopefully this post has been useful for you, even if just to convey new ideas that you can build from to create your own job processing system to meet your specific needs.
Thanks for reading!
Read more posts like this